Navigation Meshes Overview
A JS plugin for fast pathfinding using navigation meshes, with optional wrappers for the Phaser v2 and Phaser v3 game engines.
(Note: if you are viewing this on GitHub or NPM, you might want to check out the HTML documentation here.)
Table of Contents:
- Introduction
- Installation
- Creating a Navigation Mesh
- Usage
- Performance Comparison
- Community Examples
- Development
- Changelogs
- References
- To Dos
Introduction
Pathfinding is essentially the problem of solving a maze, finding a path between points while avoiding obstacles. When pathfinding in games, we need to:
- Represent the game world in a way that defines what areas are walkable.
- Search that representation for the shortest path.
When it comes to 2D pathfinding, a common approach is to represent the world using tiles (a grid) and then search for a path using the A* algorithm (e.g. Phaser AStar). If you have a 50 x 50 tile world, searching for a path involves searching through a representation of the world with up to 2500 locations/nodes (50 x 50 = 2500).
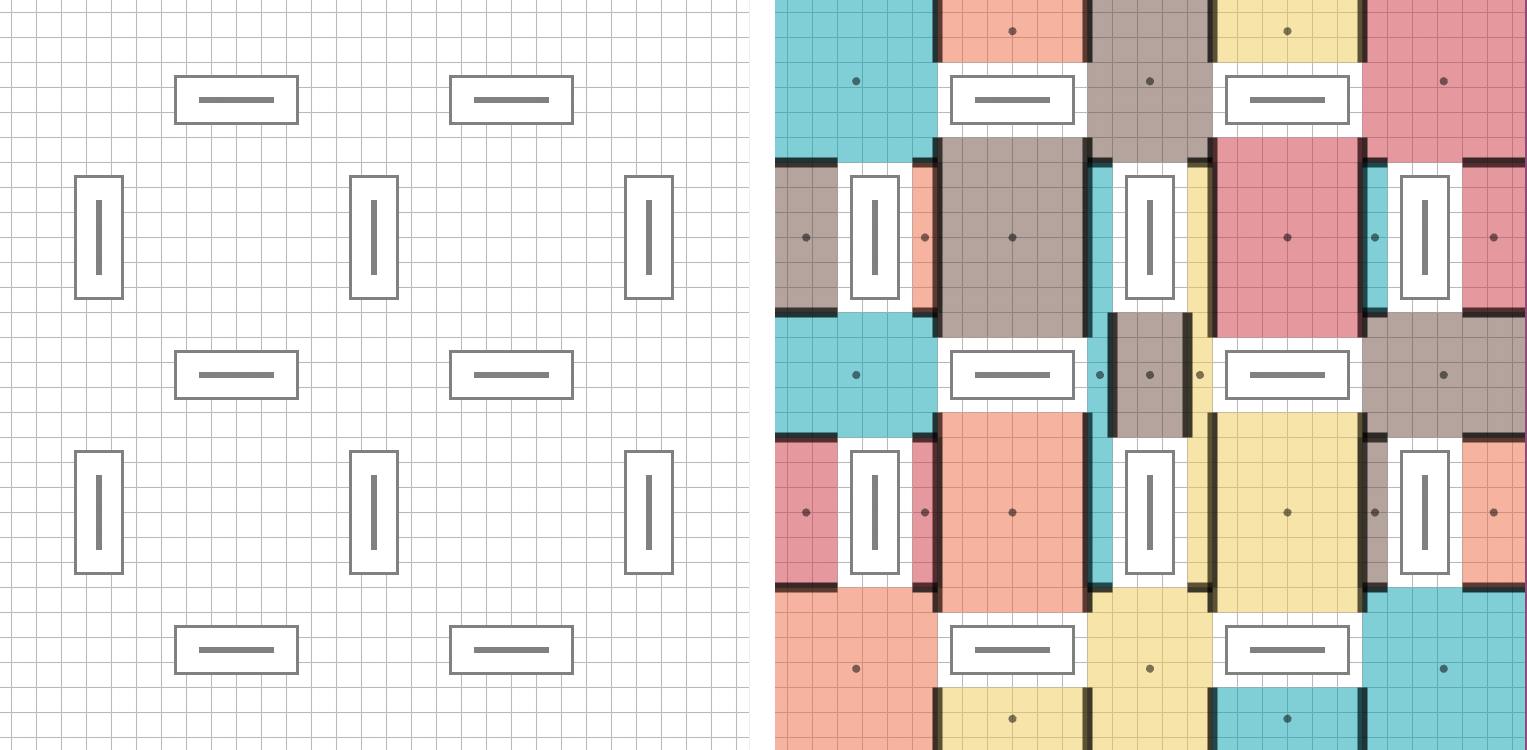
This plugin uses navigation meshes to simplify that search. Instead of representing the world as a grid of tiles, it represents the walkable areas of the world as a mesh. That means that the representation of the world has far fewer nodes, and hence, can be searched much faster than the grid approach. This approach is 5x - 150x faster than Phaser's A* plugin (see performance section), depending on the mesh.
The example map below (left) is a 30 x 30 map. As a grid, there are 900 nodes, but as a navmesh (right) there are 27 nodes (colored rectangles).
Installation
This repository contains 3 related JS packages:
navmesh- core logic, game-engine agnostic, usable outside of Phaser.phaser-navmesh- Phaser v3 wrapper aroundnavmeshthat creates a Phaser 3 Scene plugin. Phaser 3 is expected to be a dependency in your project.phaser2-navmesh- Phaser v2 wrapper aroundnavmeshthat creates a Phaser 2 game plugin. Phaser 2 or Phaser-ce is expected to be in the global scope.
You can use any of them as a script or as a module in your bundler of choice.
As a Script
You can drop in any of the transpiled code into your project as a standalone script. Download the version that you want from the GitHub release.
E.g. if you wanted phaser-navmesh, you would add this to your HTML:
<script src="phaser-navmesh.min.js"></script>
Inside of your own script, you can now use the global variable PhaserNavMeshPlugin (see library name in the above table), e.g.
const game = new Phaser.Game({
  type: Phaser.AUTO,
  width: 750,
  height: 750,
  plugins: {
    scene: [
      { key: "NavMeshPlugin", plugin: PhaserNavMeshPlugin, mapping: "navMeshPlugin", start: true }
    ]
  }
});
See usage for more information on how to use each of the three modules in this repository.
As a Module
Install the appropriate dependency:
npm install --save navmeshfor usage outside of Phasernpm install --save phaser-navmeshfor Phaser 3npm install --save phaser2-navmeshfor Phaser 2
To use the transpiled and minified distribution of the library (recommended for most users):
// Phaser 3
import { PhaserNavMeshPlugin } from "phaser-navmesh";

// Phaser 2
import { Phaser2NavMeshPlugin } from "phaser2-navmesh";

// NavMesh (commonjs or es import)
const { NavMesh } = require("navmesh");
import { NavMesh } from "navmesh";
To use the raw TypeScript source code so you can optimize the bundle yourself:
import { PhaserNavMeshPlugin } from "phaser-navmesh/src";
Creating a Navigation Mesh
Creating a navigation mesh is the process of defining the walkable areas within you world as a series of polygons. If you are using a tilemap, then you can probably get away with just auto-generating the mesh using buildMeshFromTilemap in Phaser 3 (or if you are using NavMesh without the Phaser wrapper, see buildPolysFromGridMap).
If you've got a more complex situation, you can use a tilemap editor like Tiled to create your mesh and load it into the game. See guide.
(Note: the current version of the library only supports convex polygons. There are libraries like poly-decom.js for decomposing a concave polygon into easier to manage convex polygons. It's on the to do list to handle any polygon, but I've found that automatically decomposing polygons leads to worse performance than hand-mapping the levels with convex polygons.)
Usage
You can find code snippets for the different use cases below. You can also jump directly to a few example projects in this repository for:
navmesh (API reference)
If you don't need the Phaser wrappers, you can construct navmeshes directly from points using the navmesh package:
import { NavMesh } from "navmesh";

/*
  Imaging your game world has three walkable rooms, like this:

    +-----+-----+
    |     |     |
    |  1  |  2  |
    |     |     |
    +-----------+
          |     |
          |  3  |
          |     |
          +-----+
*/

// The mesh is represented as an array where each element contains the points for an indivdual
// polygon within the mesh.
const meshPolygonPoints = [
  [{ x: 0, y: 0 }, { x: 10, y: 0 }, { x: 10, y: 10 }, { x: 0, y: 10 }], // Polygon 1
  [{ x: 10, y: 0 }, { x: 20, y: 0 }, { x: 20, y: 10 }, { x: 10, y: 10 }], // Polygon 2
  [{ x: 10, y: 10 }, { x: 20, y: 10 }, { x: 20, y: 20 }, { x: 10, y: 20 }] // Polygon 3
];
const navMesh = new NavMesh(meshPolygonPoints);

// Find a path from the top left of room 1 to the bottom left of room 3
const path = navMesh.findPath({ x: 0, y: 0 }, { x: 10, y: 20 });
// ⮡  [{ x: 0, y: 0 }, { x: 10, y: 10 }, { x: 10, y: 20 }]
If your world is a grid (e.g. a tilemap), NavMesh also has a utility buildPolysFromGridMap that can automatically generate meshPolygonPoints from a 2D array.
phaser-navmesh (API reference)
If you are working with Phaser 3, you can use the phaser-navmesh package, which provides a Scene plugin. Play with a live example on CodeSandbox here, or peek at the examples in this repository for more complete usage.
import Phaser from "phaser";
import { PhaserNavMeshPlugin } from "phaser-navmesh";

const game = new Phaser.Game({
  type: Phaser.AUTO,
  parent: "game-container",
  width: 750,
  height: 750,
  plugins: {
    scene: [
      {
        key: "PhaserNavMeshPlugin", // Key to store the plugin class under in cache
        plugin: PhaserNavMeshPlugin, // Class that constructs plugins
        mapping: "navMeshPlugin", // Property mapping to use for the scene, e.g. this.navMeshPlugin
        start: true
      }
    ]
  },
  scene: {
    preload: preload,
    create: create
  }
});

function preload() {
  this.load.tilemapTiledJSON("map", "tilemaps/map.json");
  this.load.image("tiles", "tilemaps/tiles.png");
}

function create() {
  // Set up a tilemap with at least one layer
  const tilemap = this.add.tilemap("map");
  const tileset = tilemap.addTilesetImage("tiles", "tiles");
  const wallLayer = tilemap.createStaticLayer("walls", tileset);
  wallLayer.setCollisionByProperty({ collides: true }); // Or, however you set tiles to collide.

  // Automatically generate mesh from colliding tiles in a layer or layers:
  const navMesh = this.navMeshPlugin.buildMeshFromTilemap("mesh", tilemap, [wallLayer]);
  const path = navMesh.findPath({ x: 0, y: 0 }, { x: 300, y: 400 });
  // ⮡  path will either be null or an array of Phaser.Geom.Point objects

  // Alternatively, you can load a navmesh created by hand in Tiled that is stored in an object
  // layer. See the creating a navmesh guide for more info on this.
  // const objectLayer = tilemap.getObjectLayer("navmesh");
  // const navMesh = this.navMeshPlugin.buildMeshFromTiled("mesh1", objectLayer, 12.5);
}
The plugin comes with some methods for visually debugging your navmesh:
navMesh.enableDebug(); // Creates a Phaser.Graphics overlay on top of the screen
navMesh.debugDrawClear(); // Clears the overlay
// Visualize the underlying navmesh
navMesh.debugDrawMesh({
  drawCentroid: true,
  drawBounds: false,
  drawNeighbors: true,
  drawPortals: true
});
// Visualize an individual path
navMesh.debugDrawPath(path, 0xffd900);
phaser2-navmesh (API reference)
If you are working with Phaser 2, you can use the phaser2-navmesh package, which provides a game plugin. See this example for more complete usage. You can also look at the previous section for Phaser usage.
Performance Comparison
(Note: these comparisons were done in any earlier verison of the repo before Phaser v3 was released. The plugins tested haven't been released in v3 versions yet, so this section could use an update. That said, the results should be the same.)
Comparing this navmesh plugin against:
- Phaser's grid-based A* plugin. Navmesh is approximately 5x - 150x faster.
- A faster, grid-based A* search, EasyStar.js. Navmesh is approximately 5x - 20x faster.
Performance depends on the size of the area that needs to be searched. Finding for a path between points that are 50 pixels away is (generally) going to be much faster than finding a path between points that are 5000 pixels away.
Details (see src/library/performance):
Performance Comparison, 100000 iterations, 30x30 tilemap

Short paths (150 - 500 pixel length)

    Average time per iteration:
        AStart Plugin: 0.02470ms
        EasyStar Plugin: 0.02876ms
        NavMesh Plugin: 0.00575ms

    Comparison:
        NavMesh is 4.30x faster than Phaser AStar
        NavMesh is 5.00x faster than EasyStar

Long paths (600 pixels and greater length), average time per iteration:

    Average time per iteration:
        AStart Plugin: 1.38710ms
        EasyStar Plugin: 0.15977ms
        NavMesh Plugin: 0.00738ms

    Comparison:
        NavMesh is 187.95x faster than Phaser AStar
        NavMesh is 21.65x faster than EasyStar
Community Examples
- TypeScript Server Example - Right click to move the agent, see discussion thread here with links to source code.
Development
Pull requests are welcome (see todos)! If you want to run this repo locally, make sure you have node installed. Download the repo, open a terminal in the repo folder and run:
npm i -g yarn
yarn
yarn bootstrap
This project uses lerna and yarn workspaces to manage multiple packages within one repository. npx yarn will pull the root dependencies (and install yarn if needed) and npm run bootstrap will use lerna & yarn to pull and link dependencies within "packages/". This project has the following packages:
navmesh- core logic, game-engine agnosticphaser-navmesh- Phaser Plugin v3 wrapper aroundnavmeshphaser2-navmesh- Phaser Plugin v2 wrapper aroundnavmesh
The project is controlled via npm scripts. The main ones to use:
yarn build:libs- will build production versions of the three libraries within "packages/".yarn test- will run the automated tests against the libraries.serve:examples- will build, serve and watch the three examples. Phaser 3 examples are at localhost::8080, Phaser 2 examples at localhost::8081 and node examples at localhost::8082.yarn dev- watch the libraries & serve the examples. If you are working on the library, this is the easiest way to do "functional testing" by using the library in a game environment.yarn dev:phaser3,yarn dev:phaser2,yarn dev:node- these will watch the relevant libraries and serve one the corresponding example. Useful for dev on a specific library.
A few tips, because Lerna + Yarn is complicated, and I keep forgetting these:
- Running a command in a workspace:
yarn workspace <workspace_name> <command>- Example:
yarn workspace navmesh add typescript --dev
- Running a command in a set of workspaces:
lerna run --parallel watch --scope <scope>- Example:
lerna run --parallel build --scope '{navmesh,phaser-navmesh,phaser-navmesh}'
- Add a dev dependency to the root:
yarn add <dependency> --dev -W
- Running a command in all workspaces:
yarn workspaces <command>- Example:
yarn workspaces build lerna run --parallel watch
Changelogs
References
Helpful resources used while building this plugin:
- Inspired by PatrolJS, an implementation of navmeshes for threejs
- Navmesh path-finding algorithm explanations:
- Advice on astar heuristics
To Dos
- Features
- Allow non-square navmesh polygons from Tiled - ideally, any convex shape.
- Reimplement the autotessalation version of the lib & try libtess in quad mode.
- The astar heuristic & cost functions need another pass. They don't always produce the shortest path. Implement incomplete funneling while building the astar path?
- The navmesh assumes any polygon can reach any other polygon. This probably should be extended to put connected polygons into groups like patroljs.
- Better warnings for devs - warn on empty map, warn on disconnected map, warn if polygons are malformed.
- Factor in the layer position / scale / rotation
- Testing
- Check against tilemap that is larger than the screen
- Research
- There are probably optimization tricks to do when dealing with certain types of shapes. E.g. we are using axis-aligned boxes for the polygons and it is dead simple to calculate if a point is inside one of those...
- Investigate Points-of-Visibility pathfinding to compare speed